")


Debian I2P Πακέτα
Debian ή Ubuntu, Όλες οι Εκδόσεις
Τα πακέτα Debian λειτουργούν στις περισσότερες πλατφόρμες που λειτουργούν με:- Ubuntu (Bionic 18.04 and newer)
- Mint(Tara19) or newer
- Debian Linux (Buster and newer)
- Knoppix
- Επιλογή 1: Πρόσφατες εδόσεις του Ubuntu και των παραγώγων του (Δοκιμάστε αυτή την επιλογή αν δεν χρησιμοποιείτε Debian)
- Επιλογή 2: Debian (συμπεριλαμβάνει παράγωγα του Debian)
Οδηγίες για Ubuntu και παράγωγα αυτού, όπως Linux Mint & Trisquel
Προσθήκη του PPA μέσω γραμμής εντολής και εγκατάσταση του Ι2Ρ
-
Ανοίξτε ένα τερματικό και πληκτρολογήστε:
sudo apt-add-repository ppa:i2p-maintainers/i2p
This command will add the PPA to/etc/apt/sources.list.dand fetch the gpg key that the repository has been signed with. The GPG key ensures that the packages have not been tampered with since being built. -
Ενημερώστε τον διαχειριστή πακέτων για το νέο ΡΡΑ εισάγοντας:
sudo apt-get update
Η εντολή αυτή θα ανακτήσει την πιο πρόσφατη λίστα λογισμικού από κάθε αποθετήριο το οποίο είναι ενεργό στο σύστημά σας, συμπεριλαμβανομένου και του ΡΡΑ του Ι2Ρ που προστέθηκε με την προηγούμενη εντολή. - Είστε έτοιμος να εγκαταστήσετε το I2P!
sudo apt-get install i2p
Adding the PPA Using the Software Center
-
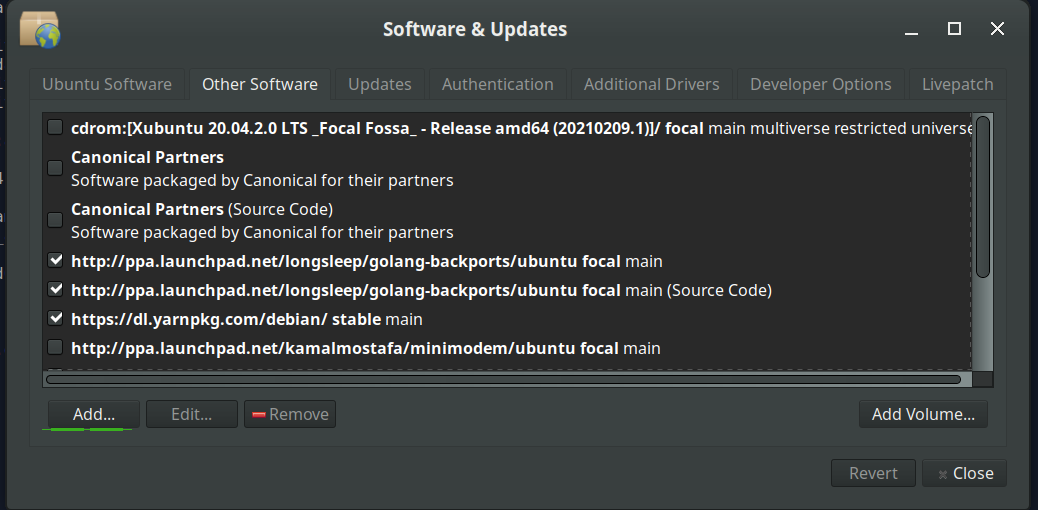
Open "Software and Updates" via the applications menu.

-
Select the "Other Software" tab and click the "Add" button at the
bottom to configure the PPA.
-
Add the PPA by pasting the URL:
ppa:i2p-maintainers/i2pinto the PPA dialog.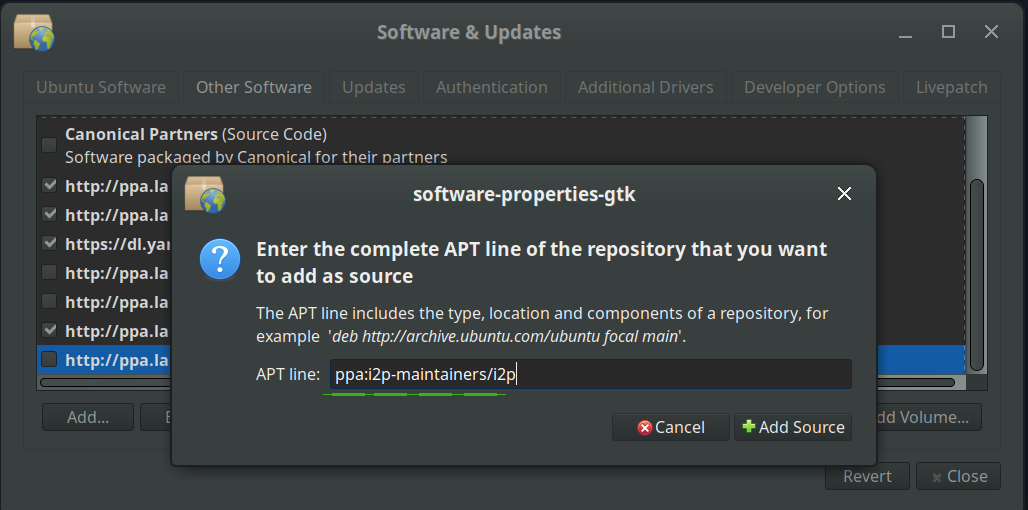
-
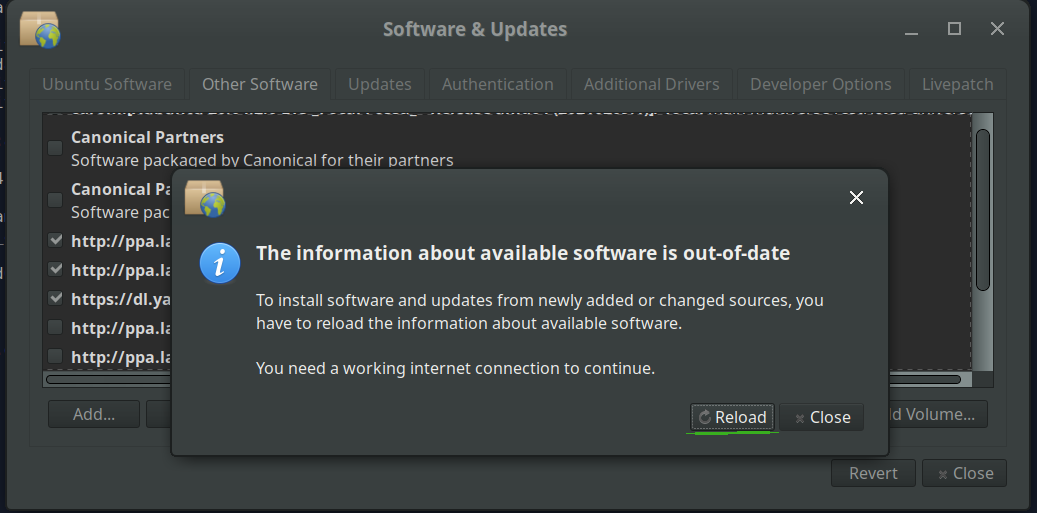
Download the repository information with the "Reload" button.
-
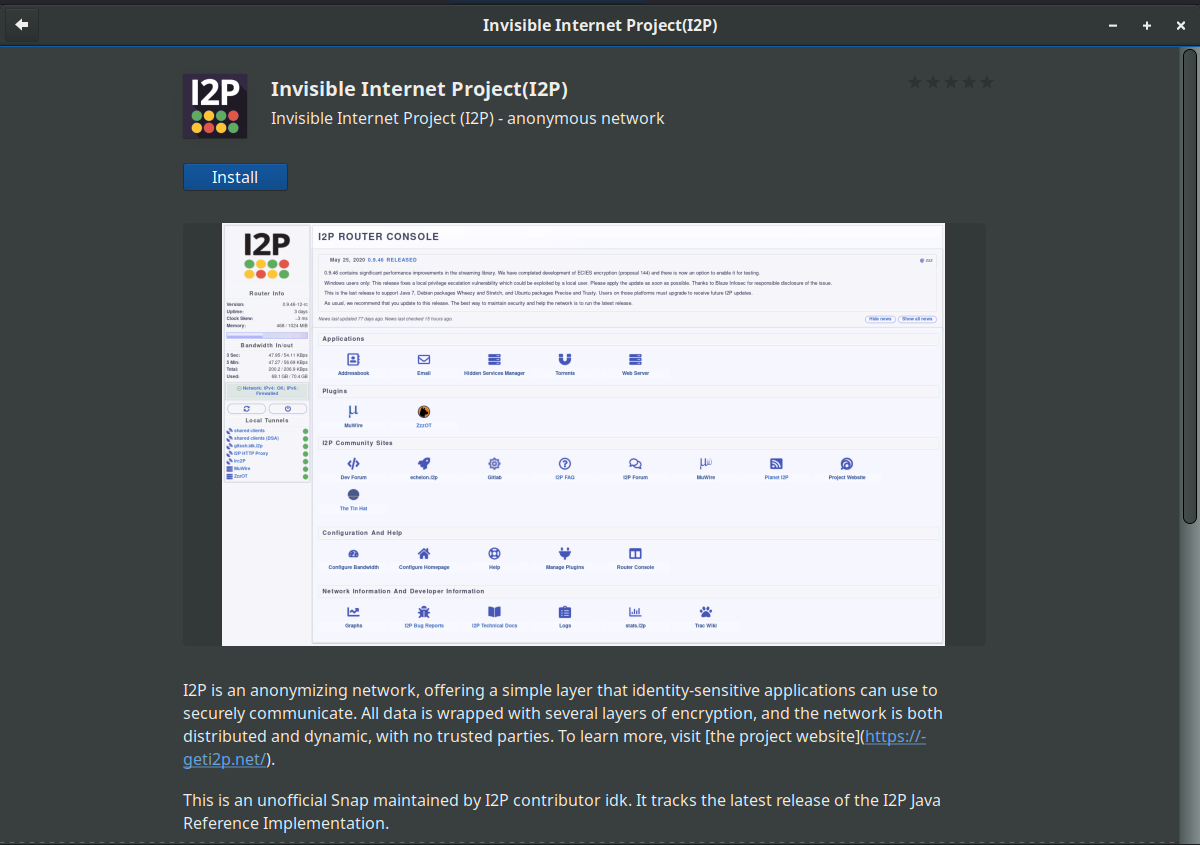
Install the I2P software using the "Software" tool from the
applications menu.
Οδηγίες για Debian.
NOTICE:
Our old Debian repos deb.i2p2.de and
deb.i2p2.no are EOL.
Please follow these instructions
to update to the new repository, deb.i2p.net.
Σημειωση: Τα βήματα που ακολουθούν πρέπει να εκτελεστούν με δικαιώματα διαχειριστή (δηλαδή, αλλάζοντας χρήστη
σε root με την εντολή su ή πληκτρολογώντας στην αρχή κάθε εντολής το sudo).
- ,
- Ensure that
apt-transport-https,curl,lsb-releaseare installed.sudo apt-get update sudo apt-get install apt-transport-https lsb-release curl -
Check which version of Debian you are using on this page at the Debian wiki
and verify with
/etc/debian_versionon your system. Then, for Debian Bullseye or newer distributions run the following command to create/etc/apt/sources.list.d/i2p.list.
# Use this command on Debian Bullseye or newer only. echo "deb [signed-by=/usr/share/keyrings/i2p-archive-keyring.gpg] https://deb.i2p.net/ $(lsb_release -sc) main" \ | sudo tee /etc/apt/sources.list.d/i2p.list# Use this command on Debian Downstreams like LMDE or ParrotOS only. echo "deb [signed-by=/usr/share/keyrings/i2p-archive-keyring.gpg] https://deb.i2p.net/ $(dpkg --status tzdata | grep Provides | cut -f2 -d'-') main" \ | sudo tee /etc/apt/sources.list.d/i2p.list# Use this command on Debian Buster or older only. echo "deb https://deb.i2p.net/ $(lsb_release -sc) main" \ | sudo tee /etc/apt/sources.list.d/i2p.list# Use this command on Debian Buster or older only. echo "deb https://deb.i2p.net/ $(dpkg --status tzdata | grep Provides | cut -f2 -d'-') main" \ | sudo tee /etc/apt/sources.list.d/i2p.list - Κατεβάστε το κλειδί που χρησιμοποιήθηκε για την υπογραφή του αποθετηρίου:
curl -o i2p-archive-keyring.gpg https://geti2p.net/_static/i2p-archive-keyring.gpg - Display the key fingerprint.
gpg --keyid-format long --import --import-options show-only --with-fingerprint i2p-archive-keyring.gpg7840 E761 0F28 B904 7535 49D7 67EC E560 5BCF 1346 - Copy the keyring to the keyrings directory:
sudo cp i2p-archive-keyring.gpg /usr/share/keyrings/etc/apt/trusted.gpg.d.sudo ln -sf /usr/share/keyrings/i2p-archive-keyring.gpg /etc/apt/trusted.gpg.d/i2p-archive-keyring.gpg -
Notify your package manager of the new repository by entering:
sudo apt-get update - You are now ready to install I2P! Installing the
i2p-keyringpackage will ensure that you receive updates to the repository's GPG key.
sudo apt-get install i2p i2p-keyring
Μετά την ολοκλήρωση της διαδικασίας εγκατάστασης μπορείτε να προχωρήσετε στο επόμενο βήμα του ξεκινώντας με το I2p για να το ρυθμίσετε στο σύστημά σας.
Ενέργειες μετά την εγκατάσταση
Χρησιμοποιώντας αυτά τα πακέτα ο δρομολογητής I2P μπορεί να ξεκινήσει με τους ακόλουθους τρεις τρόπους:-
"κατά παραγγελία" χρησιμοποιώντας το σενάριο i2prouter. Απλώς εκτελέστε "
i2prouter start" από την γραμμή εντολής. (Σημείωση: Μην χρησιμοποιείτε sudo και μην το εκτελείτε ως χρήστης root!) -
"κατά παραγγελία" χωρίς το java service wrapper
(το οποίο χρειάζεται σε συστήμα που δεν είναι Linux ούτε x86) εκτελώντας "
i2prouter-nowrapper". (Σημείωση: Μην εκτελείτε την εντολή αυτή μέσω sudo ή ως χρήστης root!) -
ως υπηρεσία η οποία εκτελείται αυτόματα κατά την εκκίνηση του υπολογιστή, ακόμη
και πριν την σύνδεση του χρήστη. Η υπηρεσία μπορεί να ενεργοποιηθεί μέσω "
dpkg-reconfigure
i2p
" είτε ως χρήστης root είτε με sudo. Αυτός είναι και ο συνιστώμενος τρόπος λειτουργίας.
Όταν εγκαθίσταται για πρώτη φορά, θυμηθείτε να ρυθμίσετε το ΝΑΤ/τοίχος προστασίας εφόσον μπορείτε. Οι προς προώθηση θύρες μπορούν να βρεθούν στην σελίδα ρύθμισης δικτύου της κονσόλας του δρομολογητή. Αν χρειαστείτε βοήθεια για την προώθηση των θυρών, ο ιστότοπος portforward.com ίσως σας φανει χρήσιμος.
Παρακαλώ επιθεωρήστε και προσαρμόστε τις ρυθμίσεις εύρους ζώνης στην σελίδα των ρυθμίσεων καθώς οι αρχικές ρυθμίσεις 96Kb/s λήψη και 40KB/s αποστολή είναι αρκετά συντηρητικές.
If you want to reach I2P Sites via your browser, have a look on the browser proxy setup page for an easy howto.