A web browser will need to be configured to access sites and services on the I2P network, and to utilize outproxies. Below are walkthroughs for some of the most popular browsers.
Windows用Firefoxプロファイル
If you are using Windows, the recommended way of accessing the I2P network is using the Firefox profile.
If you used the Easy-Install bundle, the Firefox profile is included and you can skip this page.
If you do not wish to use that profile or are not on Windows, you will need to configure a browser.
How To Configure Your Browser
Firefox
Extension-based Configuration: I2P in Private Browsing
A new way of automatically configuring the I2P Browser is currently being tested. It uses the Firefox's "Container Tabs" to build private browsing tools for use with I2P and I2P applications.
It does pre-configuration of your browser by enabling some of the privacy Browser Settings like ResistFingerprinting, and enforces WebRTC proxy obedience. It also contains menus, shortcuts, and monitoring tools improving Firefox's integration with I2P. It should not substantially interfere with your non-I2P Firefox tabs.
The extension, I2P in Private Browsing, can be obtained from the Mozilla addon store.
The source code for the extension is available at i2pgit.org.
Firefox 57 以上での説明:
右上のメニューボタンから設定を選択してください。下にスクロールしてネットワークプロキシ セクションを見つけてください。下記に例示されています。設定をクリックしてください。

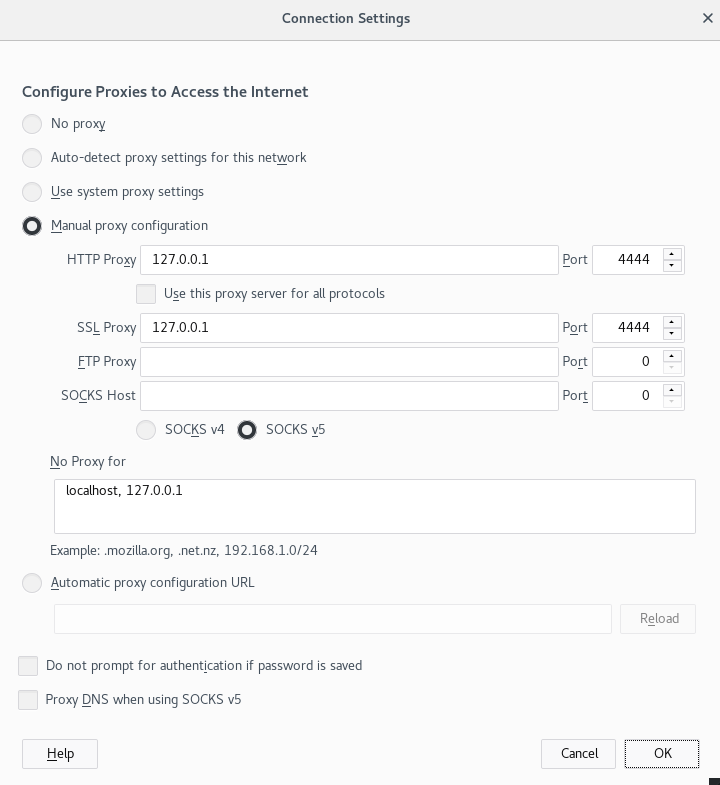
接続設定のポップアップがでたら、手動プロキシ
設定を選んでください。HTTPとSSLプロキシ双方にアドレス
127.0.0.1、ポート 4444を下記のスクリーンショットの通り設定してください。
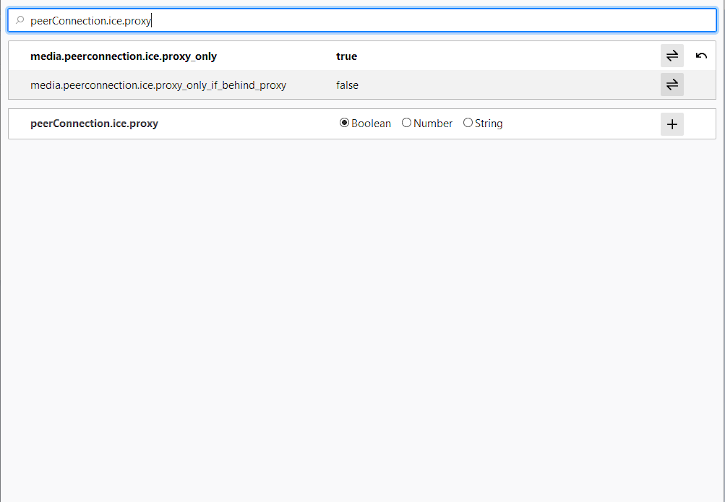
最後にアドレス about:config にアクセスして、プロパティ media.peerConnection.ice.proxy_onlyを検索し、この設定をTrueにしてください。
Chrome
Extension-based Configuration: I2PChrome.js(Experimental, additional configuration)
An experimental, partially-automated configuration process for Chrome is available. In order to configure it, create a new Profile especially for your I2P browsing, separate from the default profile. Then install this Extension in your newly-created profile. This profile is now configured to use I2P. Highly detailed instructions are available at the homepage.
すべてのChromeのバージョン
Chromium-Based Browsers like Chrome have slightly different places for their proxy settings depending on variant and platform. These instructions may be slightly different in Brave or Iridium, for instance. From the Main menu, navigate to the Settings, and search for the menu item. Clicking it will open the right settings for your platform.
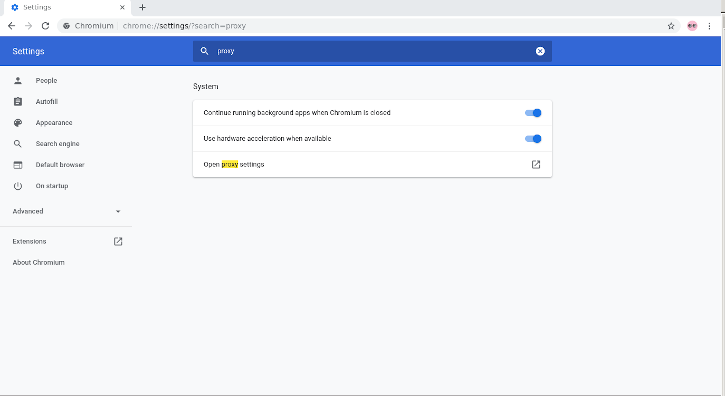
On Windows, this button will launch you into the shared proxy settings used by Internet Explorer, and you can configure it by following the Internet Explorer 8 guide.
IceRaven およびその他のFirefox for Android
拡張機能と設定
Modern Firefoxes(The "Fenix" based Firefoxes) do not generally have an about:config page for you to configure proxy settings manually. It is further not possible to use most extensions in Fenix-based Firefoxes. It is possible to enable support about:config and enable more extensions in Firefox Nightly at the time of this writing, but it's a manual and difficult process. IceRaven is a fork of Firefox which enables a collection of extensions while Mozilla and the Mozilla Community work on adding support for extensions to Firefox for Android. It provides the easiest way of configuring a modern Firefox-based Browser for Android. It does not come from Mozilla and carries no guarantees from them. Installing the extension in IceRaven will proxy all your IceRaven browsing over I2P.
If you have not installed IceRaven yet, go to the next step. If you have been using IceRaven for a while, go to the main menu, select the History tab, and make sure that you have cleared information about your past browsing by tapping the "Delete History" button.
Open the IceRaven main menu, and scroll to the top until you see the "Add-Ons" submenu. Tap the "Add-Ons Manager" option in the "Add-Ons" submenu. Install the extension named I2P Proxy for Android and other Systems.
IceRavenブラウザのI2Pを利用するための設定が整いました。
This extension also works in pre-Fenix(Pre-Firefox-68) Firefox based web browsers, if installed from the following addons.mozilla.org URL. I2P Proxy for Android and Other Systems
この拡張機能は Chromium 拡張機能と同一で、同じソースからビルドされています。
Firefox Nightlyで拡張機能のサポートを有効にするには、Mozillaが ブログで提供しているステップを踏む必要があります。
Internet Explorer
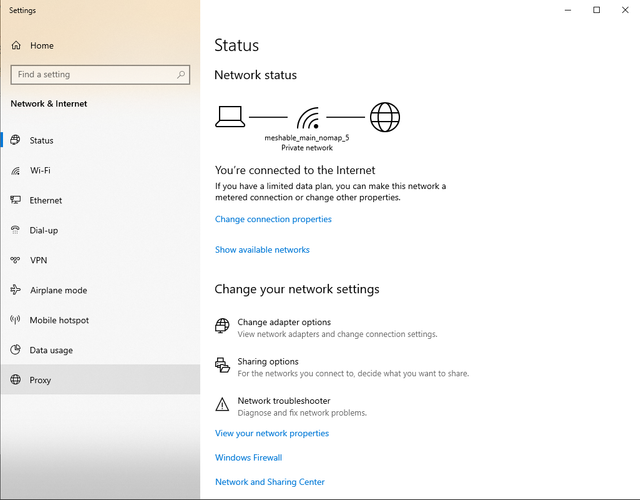
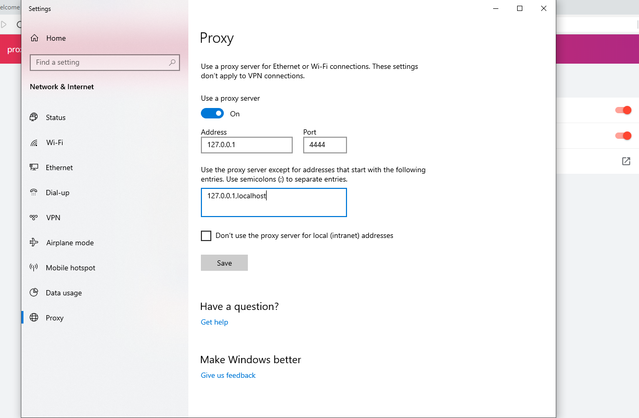
スタートメニューで「ネットワークとインターネット」を検索し、設定画面を 開きます。メニューの最後の項目がプロキシ設定ですのでプロキシ設定を クリックしてI2Pに接続しましょう。
それでは「LANにプロキシサーバーを使用する」と「ローカルアドレスには プロキシサーバーを使用しない」のチェックマークをつけてください。詳細設定のボタンをクリックすると ポートの設定ウィンドウが開きます。図のように、IP 127.0.0.1、ポート番号 がHTTPに4444、HTTPSに4445と数値を入力してください。OKをクリックすると 設定が保存され、ブラウザはI2Pプロキシを使用する準備ができました。
アウトプロキシ 利用規約
The I2P network is a peer-to-peer overlay network. Proxying to the clearnet is not part of its design or function with regards to its communication protecting network features.
The I2P Project itself does not run any proxies to the Internet. The I2P software includes a default outproxy: exit.stormycloud.i2p. These are run by StormyCloud Inc.
https://stormycloud.orgBy default, I2P comes with one outproxy configured: exit.stormycloud.i2p.
I2P Sites that are accessible via .i2p addresses are also not allowed via the outproxies.
Tor はインターネットへのアウトプロキシとして使用するためのブラウザを提供します。


